


This script will translate simple HPGL-1 (as exported via CorelDraw) into basic RS274NGC (G-Code). Only pen-up (PU) and pen-down (PD) commands with two numbers separated by a space and then a line break are translated.
For example:
PU0 0;
PD0 22;
PD-1 44;
PD-3 65; and so on.
April 21, 2011
Suitcase Fusion launch failure - fm core has been stopped
This is simply for future reference by me when I forget what I did to fix this the next time it happens. Or by you, if you google for a solution to this dilemma. This has happened more than once on our newish iMac running Snow Leopard, Extensis Suitcase Fusion 2, and of course QuarkXPress; the essential Mac layout program from hell, made by people who think that anyone dissatisfied with Quark's Mac commitment should "switch to something else." In this case it wasn't a Quark bug, but apparently sloppy code somewhere by Extensis. Something in the cache gets corrupted, and poor Suitcase can't launch itself. It will tell you to start it manually from System Preferences, which also won't work.The most straightforward way to fix this problem is to clean your caches, which can easily be done by installing the shareware program Snow Leopard Cache Cleaner and just run it. I selected all users and "light cleaning" which did the trick. Thanks Northern Softworks! You've proved that some people in Alaska are actually not insane.
YMMV, but if it does, tell me about it.
Posted by Hal Eckhart at 04:51 PM
| Comments (0)
January 13, 2011
How to set up a LaserWriter 8500 for Mac OS X Snow Leopard
The LaserWriter 8500 was a hell of a workhorse printer for desktop publishing about 12 years ago. Ours cost a couple of grand or so, and even generic toner isn't cheap, but one cartridge will print 14,000 pages. And it prints up to A3 paper (11.7 in x 16.5 in). Ours has well over 50,000 pages on it, and it's in fine shape despite the cat hair and fur balls inside every nook and cranny.But it no longer functions in the latest version of OS X, as they've finally got rid of AppleTalk. So it will require a bit of elbow grease to get it up and running.
What I did to get it going worked for me, but it was enough trouble that it seemed that it might be helpful to document the process. Several parts of this ordeal worked unexpectedly, and the manual is both extremely out of date and some of the wording is ambiguous.
One word of warning is that you won't be able to set some of the less critical defaults (like turning off the rather useless startup page) unless you're able to connect an OS 9 computer to the printer and run the printer setup utility. Yes, you heard right. OS freaking 9. If you have an old G4 and an OS 9 install CD that came with it, you can just boot off the CD and do what you need without installing the OS. It's hard to believe how quaint and fugly the Mac world was back then. Remember Conflict Catcher?
Anyway, here's what worked for me.
To make this work, you'll need 3 bits of information to start. The MAC (machine) address, the IP address, and the printer name that was assigned when it was set up a long time ago. If you don't remember (like me) and you turned off the startup page, you'll have to return it to its default state. You do this by popping out the communication switch, turning printer off, turning it back on (wait for it to print the page) and then pop the switch back in. Unless you want to do this all again.
On the printed page, you'll see the MAC address (mine is 00:0E:3B:00:2A:1B). The IP address will be 0.0.0.0 which doesn't do anyone any good, so it will have to be changed. And the name still needs to be set to get it to work under Snow Leopard.
Now you need to determine a permanent IP address for the printer; one that's accessible on your network, but one that won't be overwritten by your router or server or whatever that controls DHCP for your network. I chose 192.168.1.145 because it's far enough away (on this home network) from everything else that there's no chance it will conflict with another IP.
Make up a name for your printer. Don't use spaces or funky characters to play it safe. I thought lw_8500 was a nice plain vanilla printer name.
Add these two items to your /etc/hosts file in the form of
IP_address (space) printer_name
like this:
192.168.1.145 lw_8500
hosts is owned by root, so edit it something like this in a terminal window:
sudo nano /etc/hosts
and then enter your password when it asks for it.
Nano is a little funky if you're not used to terminal appications, but take your time and it will be fine.
Scroll down to the bottom of the text.
Enter
192.168.1.145 lw_8500
(or whatever you've come up with) on a new line.
Press ctrl-o to write write the file.
Enter to save.
ctrl-x to quit.
The next step is to type this into a terminal window to force an entry into your systems arp table (whatever the hell that means):
arp -s hostname printer_Ethernet_address
such as:
sudo arp -s 192.168.1.145 08:00:07:64:d1:a4
(enter Mac user password)
Then, to assign the IP address to the printer, you simply ping the printer name:
ping printer_IP_name
like this:
ping lw_8500
(after it successfully pings the printer, press ctrl-c to end)
You can set a few preferences by telnetting in to the printer like this:
telnet lw_8500
and then enter your password (or set one).
That's it for the terminal stuff. Of course, the printer won't be recognized like a normal modern device. That would be too damn easy! So try this:
Go to the Print & Fax preference pane, and click the plus button.
Go to the IP tab.
Select Line Printer Deamon - LPD.
Enter 192.168.1.145 in the address field.
Enter lpd://lw_8500/ in the location field.
For driver, select Apple LaserWriter 8500 v3010.103
And add.
Happy Printing!
* Postscript:
The 8500 is still working, but there seems to be a battery somewhere that's dead or a loose connection, so it keeps losing the configuration data and has to be reprogrammed every week or two. This means that I have to run through all the steps from pinging the printer and down. I'll update this if I figure that out.
Posted by Hal Eckhart at 05:52 PM
| Comments (0)
November 30, 2010
How to make a functional Amazon Associates link from generated "link to this page" code that will actually validate
I like to run blog posts through the W3C Validator. It catches a few errors and typos that may cause trouble down the line. But some auto-generated code can cause the validator to throw so many errors that it's difficult to see what I need to fix. Amazon Associates' link generator is something that has frustrated me plenty for the few times I've used it. Just inserting one link on a previously valid page will throw 10 errors and 15 warnings. But I think I've found a solution.First, I want to make a couple of things perfectly clear. (A) I'm only posting this because I've figured it out twice, and couldn't find the answer on the internets when I forgot what I learned the first time and (B) yes, I realize it's only a cheatey little hack that just tricks the validator, but I don't care. Amazon will do what they do, and I don't really feel like wasting time researching the issue when Amazon obviously doesn't care about clean code. Plus, I want to make sure I make a little money when someone buys stuff because I made a well reasoned and insightful argument as to why they should.
The following assumes that you know something about both Amazon Associates and html. If not, go learn about them and come back later.
In brief, the answer to this dilemma is to use TinyURL. That's it, problem solved. For details, keep reading.
When I signed up for the Amazon Associates program a couple of years ago, I was encouraged to install their little toolbar in my browser. This toolbar has a purportedly helpful button that allows you to create a link to whatever Amazon page you are currently on. This link has your id code attached to it, so you'll get paid if someone visits the link and then buys the merchandise on the page.
The only problem with this method is that the rather ugly generated code will cause so many errors in the validator that it becomes a huge mess to sort out. I tried for a while to get the code to validate, but I couldn't get both the validator and Amazon's link checker to both work at the same time. However, both are happy if I just replace the target url with the TinyURL equivalent. In other words, translate the contents of the url within the first set of quotation marks after <a href= and you're good to go.
Let me know if you don't follow my reasoning here. It wouldn't be the first time I've been a bit obtuse.
Posted by Hal Eckhart at 07:53 AM
| Comments (0)
November 04, 2010
Maiden Rock sunrise timelapse
I've been taking a lot of sunrise and sunset pictures up here because we've usually got a great view of both. I finally got my Cannon 40d back from repairs, so I can once again use my cheesy Yongnuo interval timer to capture a stream of time-lapse images.
I used MEncoder to process the resulting folder of images after resizing them with an imagemagick convert shell script:
#!/bin/sh
for file; do
/opt/local/bin/convert -scale 1280 -shave 0x66 -scale 1280x720! "$file" "$file";
mv "$file" `echo "$file" | sed "s/\ /_/g" | tr [:upper:] [:lower:]` ;
done
And then:
mencoder "mf://*.jpg" -vf scale=1280:720 -o timelapse.avi -of lavf -ovc lavc
-lavcopts vcodec=mjpeg -lavfopts
i_certify_that_my_video_stream_does_not_use_b_frames
This turned an 850 MB folder of images at 3:2 into a 12.6 MB avi at 4:3 and YouTube turned that into a 3 MB mp4. My attempts at just using mencoder to turn it into an mp4 didn't come out quite as well, but I really have little idea what I'm doing. As usual.
By the way, I'm finding it amusing that almost any reference to our little town of Maiden Rock and YouTube thinks you're talking about Iron Maiden.
Posted by Hal Eckhart at 10:48 PM
| Comments (0)
March 22, 2008
Coping Calculator Upgrade
I've added a couple of tweaks to my world famous coping calculator which helps you cut a round tube to fit another round tube. It now uses vectors in the pdf version of the pattern, which should print and scale a little better than before.And there's also another version that attempts to make the page big enough to put a large pattern on it. It's here:
http://metalgeek.com/static/cope_custom.pcgi
The operation is a little flaky, but it may help somebody.
Posted by Hal Eckhart at 10:15 PM
| Comments (0)
May 27, 2006
Cut List Formatter
A few years ago, I wrote an article for Evolt about how to make fractions in a PHP script. Several times since then, I've gone back and pasted an ugly pile of numbers into a version of the script to produce a proper cut list. It would seem like the kind of thing that would be easy enough to do in Excel, but it doesn't really give me a nice looking list, and it just takes too damn many steps anyway. This script took me way too much time to create, but I learned a few more things about PHP in the process.So here's the form. It will take a random stack of decimal numbers and output a collated, sorted list; rounded to the nearest fraction (1/2 through 1/64). More instructions and source code included.
Cut List Formatter
May 07, 2006
Dan Hopper's TUBEFIT Program
About once a month someone asks me for a standalone version of my Coping Calculator, so they can run it on their computer out in their garage where there are no internets. Since the script relies heavily on the power of PHP, ImageMagick, and GD, it's not really something that can be easily translated into a separate program. At least not one that I could create.However, Dan Hopper has written this little standalone program that's vaguely similar to the Coping Calculator, but without all the bells and whistles. It runs in a terminal window and sends a postscript file directly to the printer via DOS. I really don't know how to set up a printer in DOS, so I had to find the spooled file (which went to LPT1, but that might just be my problem) and then drag it over to my USB printer. If anybody knows a better method, just let me know and I'll post your tip.
Dan's coping method differs from mine in that he's designed it to cut the tube with two passes of a power hacksaw, and then grind off the excess. However, the pattern looks very close to mine. For all I know, his math is better. He certainly explains it better anyway.
Unzip this file and put the contents wherever you want. The OVL file needs to be in the same folder as the EXE for it to work. It seemed to work for me, but there are no guarantees or promises from either Dan or me that it won't blow something up. Obviously, that's not the intent, but consider yourself warned.
TUBEFIT.zip (updated 5/19/06)
Derivation of Dan Hopper's TUBEFIT Algorithm
A brief bio of Dan
March 13, 2006
DropScript
One of the grooviest things about running a Mac is getting to play with its Unixy core, because there are scads of free tools that do scads of cool and useful things. Strangely enough, Apple has never bothered to include one of the coolest tools available in their download list. It's called DropScript (follow the "DropScript" link for the disk image).DropScript packages a shell script into a handy little droplet that lets you drop a file on it and then passes the filename and the script to the shell to let it work some magic. Or even magick.
The DropScript droplets I use the most are ones that convert the ginormous digital photos that I take into reasonable sized ones for emailing clients and friends.
The first one below is a favorite of mine. It resizes any image (or any bunch of images, but not a folder) you drop on it to an 800 pixel maximum width or height, and also swaps any spaces in the filename to underscores and makes it lower case. The image you drop will be replaced, so use this on a copy of your image, not the original, or you'll be sorry. The second version does the same thing, but also creates a separate thumbnail.
There are plenty of variations possible just by tweaking these scripts. Just read the linked man pages for the commands in the scripts. There is likely some clumsiness in my use (or misuse) of the commands in the scripts. I'm not a shell script expert by any stretch of the imagination.
For the following shell script to work, you'll need to have ImageMagick properly installed. The easiest way to do this is to use Marc Liyanage's ImageMagick package. Trust me, it's a heck of a lot easier than trying to do it yourself.
Caveats:
This works well if your droplet and the images are in the same place. It can also work between any two folders on your hard drive, but if there are spaces in any of the folder names in the path between the droplet and the images, the renaming won't work. I'm not sure what the mechanics of this are. And if I was smarter, I might be able to figure out how to pass folders of images as well. Perhaps someone could enlighten me.
Dropscript itself works as a droplet. Save either of the following two sections (starting with #!/bin/sh and ending with "done") as a plain text file (typically filename.sh), and then just drop it on the DropScript app.
----------------------------------------------------

#!/bin/sh

##
# Converts an image to 800 pixel max size.
# Destroys the original image.
# Changes filenames to lowercase and replaces spaces with "_".
##

for file; do
/usr/local/bin/convert -scale 800x800 -quality 50  "$file" "$file";
mv "$file" `echo "$file" | sed "s/\ /_/g" | tr [:upper:] [:lower:]` ;
done

----------------------------------------------------

#!/bin/sh

##
# Converts an image to 800 pixel max size.
# Destroys the original image.
# Creates a 150 pixel thumbnail with "_tn" appended to its filename.
# Changes filenames to lowercase and replaces spaces with "_".
##

for file; do
/usr/local/bin/convert -scale 800x800 -quality 50  "$file" "$file" ;
/usr/local/bin/convert -scale 150x150 -quality 50  "$file" `echo "$file" | sed "s/\ /_/g" | sed "s/\./_tn./g" | tr [:upper:] [:lower:]` ;
mv "$file" `echo "$file" | sed "s/\ /_/g" | tr [:upper:] [:lower:]` ;
done

----------------------------------------------------
* A droplet is an old Mac concept that usually refers to an AppleScript droplet. DropScript isn't Applescript, but it uses the same basic idea.
February 26, 2006
How to make the continents on a big metal globe in 10 easy steps
Or maybe not so easy. I had such a hard time figuring this stuff out that I thought somebody else might benefit from my experience. I don't want to drive down business, but a few more big funky metal globes in the world wouldn't be a bad thing. And if you have the wherewithal to do it yourself you probably wouldn't be hiring me anyway.The following is a rough and incomplete outline of one method of doing this. There are other methods. Easier methods. There are also probably open-source (and free) replacements for Photoshop. I just haven't found one that actually works for this. Gimp can output the PPMs and convert back to PNG (probably quicker than ImageMagick) but it doesn't create paths and it doesn't open RAW files without a plugin. I couldn't figure out how to make the plugin work, so I gave up. If anybody can really do this (as opposed to saying they know that it should work), just let me know. I'll try to keep this page updated with anything useful, and you can always add your own notes to the comments.
This "tutorial" (if you can call it that) assumes that you know your way around the block. I'm too lazy to make this into "The Idiot's Guide for Globe Construction". However, it should help point you in the right direction or at least give you a few ideas.
Minimum Tool Requirements
-
A computer
-
The internets
-
ImageMagick
-
PhotoShop
-
Some CAD program that reads PhotoShop's exported* postscript paths
- A cutting device or vendor that can read your CAD files
Steps
-
Go to the Globe project at NOAA, and get the tiles.
Yes, they are big, but they are free (unless you buy the CDs for $260). One of them is nearly 60 MB, but most are 20 to 30. Better make sure you have either broadband or a whole lot of coffee.
-
Import to PhotoShop and combine the whole thing into one big image.
Lose the irrelevant channels and save the image as a two-color PNG.
Your file will now look sorta like this:

PPM is a very inefficient format, because the file is written as a rectangular grid. A 1.1 MB PNG can become a 667 MB PPM, so make the PNG as few pixels as you can get away with, or the next steps will be really slow.
-
Convert to PPM with ImageMagick like this:
convert in.png out.ppm
And then go have some coffee. Across town. Walk there.
-
Split the PPM into gores with Perl and make_gores.pl
Usage: $0 in.ppm out.ppm number-of-gores
Like this:
perl make_gores.pl in.ppm out.ppm 12
-
Convert back to PNG like this:
convert in.ppm out.png
Your file will now look sorta like this:

-
In Photoshop, create a path by selecting some white, select similar, new path from selection, save path, export path to illustrator, yadda yadda. You may have to screw around with various settings to make it work.
-
Open the path in your CAD program and clean it up. I managed to get the path open with Rhino , but only after saving it with DOS line endings in BBEdit (it doesn't suck™). Otherwise, Rhino wouldn't open it and just crashed.
You will want to be careful to get rid of the tiny islands, or you will have a lot of little dots that you couldn't use even if you could figure out where the heck they go.
You can reduce the detail, but don't get too carried away. Look at Japan and England. They should be more or less recognizable.
Some things may want a little redo. Greenland can generally be one piece, but it gets cut up because it's so close to the North Pole. Either patch it back together in CAD, or go find a map online. It's not hard. And Antarctica. You really don't want 12 or 24 pieces. Find a map and scale it. And then cut maybe 4 darts in it so you can make it spherical.
-
Export to your favorite CAM format and cut it out. I saved the file as a DXF and converted it for my cutter with SheetCam, which is a fantastic cheap 2-1/2D CAM application with G-Code and HPGL output.
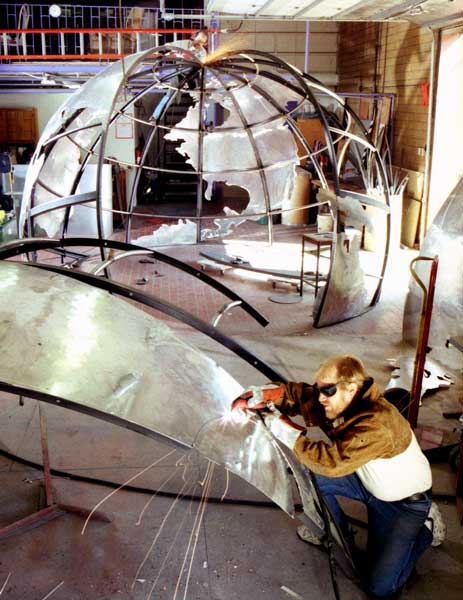
-
Hammer your pieces into shape and weld to the globe's frame.
Which might look sorta like this:
This 8 foot CorTen steel globe (to eventually be part of a sculpture in front of my building when I have time) was made with 24 gores. It should have really been more, or perhaps segmented somehow, so that there were more segments near the equator. Oh well. Next time maybe. And maybe thicker material (this was 11 ga.) would have helped. The North America on the wall above the globe was 1/4" stainless (same scale) that I did as a test. It came out remarkably smooth, although it's higher up from the equator, so the width of the pieces was less.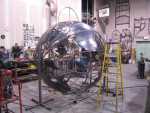
- There is no step 10. Unless you want to go back to the coffee shop. You don't have to walk this time. You can ride your bike.
Ancient History
The first globe with continents that I was hired to make was a challenge and a bit of a nightmare. It was a large globe (16 feet across and 10 feet tall, to make a little room in a theme restaurant bar), so I thought I could just beat some aluminum into shape and piece it together. After an hour of hammering, I was so frustrated that I was ready to cry. I'd made a huge amount of noise and an unsightly lump in a 4' x 10' sheet, but there was no way it was going to be usable. I didn't have a clue what to try next.
A couple of years later, I got asked to do the same exact thing again. In the interim, I'd built a CNC plasma cutter, so I imagined I could cut it out easier. Since I couldn't figure out where to find good geographic information, I used the same 12" globe, traced the continents on vellum, and scanned it into the computer. I then had to manually draw all the shorelines, which was another fantastically labor-intensive task. And thus, my lifelong hatred of CorelDraw.
Finding a way to import the basic geographic data without a lot of hand work has been the global holy grail for me. The process isn't perfect yet, but it's a whole hell of a lot better than my first pass.
* Can't I just open the path in Illustrator and save it as a DXF?
Don't bother.
For whatever idiotic reason, Adobe Illustrator has seen fit to export its DXF files with only Macintosh style (\r) line-endings. This is completely insane, because 99% of CAD programs that people actually use run on Windoze, and most of them will only read Windoze (\r\n) or Unix (\n) style line endings. So if you want to open the friggin file, you have to run it through a line-ending converter. Yes, they're easy and available everywhere, but it's not something that the ordinary guy is going to know about. And it's completely avoidable. For Chrissakes, a DXF file is supposed to be "a CAD data file format, developed by Autodesk as their solution for enabling data interoperability between AutoCAD and other programs." Since AutoCAD won't even run on a Mac, what the hell is the point of a DXF with Mac line endings? I don't know what they're smoking, but I want some of it.
To make matters worse, every curve is written as a spline, which often causes problems with CAD/CAM systems. And the only way to fix this in Illustrator involves turning the whole thing into about a zillion tiny little straight lines. Which will frequently cause other CAD/CAM issues. Sheesh.
However, Illustrator does have some nice features. It can simplify curves and reduce points, which is helpful. If you have it and can deal with the problems, it might be helpful after all.
(This applies to the Mac version of Illustrator CS. I have no idea what the latest version does.)
And finally, if there was a decent CAD program that would just import SVG files, all of this bitching would likely be irrelevant.
February 22, 2006
The Universal Tube Coping Calculator
There's now only one version of my Tube Coping Calculator. Trying to maintain various versions scattered all over the internets was too confusing, and it seems that Google doesn't like content that appears to be nearly indentical. It will be interesting to see if it breaks.Update:
I've hacked it to save your last entered info in a cookie. Cookie/form/PHP tutorial to follow.
January 21, 2006
Dreamhost webhosting
I love Dreamhost. Sometimes. One time was today, when I realized that someone completely unknown to me had followed some link that I totally forgot about and then signed up for Dreamhost. So I get $97 credited to my account. That's about 5 times more than I've made off the web. Ever. That was when one guy I tried to help out with one of my goofy scripts forked out $20 via Paypal. Mostly though, what I've earned was not even a thank you when I've tried to help some poor confused soul who doesn't quite get it.Well screw 'em. I'm going commercial. Just look at the irritating flashing button above if you doubt it. Like you could avoid it. I want to see if I can pre-pay my webhosting bill through 3006. Now that I'm pushing 50, I need to start thinking about what happens when my arms wear out and I can't swing a hammer any more.
Before I get accused of trying to con people into buying one of Dreamhost's plans (and making myself filthy rich) under false pretenses, let's discuss a few of the problems I've had in the past several years with Dreamhost.
The Bad
Occasional hardware failures.
This has led to problems, but usually not more than an hour or two. The only time I recall it being more than that was during a major DDoS attack (not really hardware related, I suppose), which seemed like it lasted for about a day (where the site and email was intermittent). And then of course, there was the big LA blackout, which killed off almost everybody out there.
Relatively slow/bad/inattentive tech support
It can take 24 hours for them to get back to you. And it can frequently take a couple of tries before someone who really knows whats going on takes charge of the situation. The really cheap plan doesn't have any phone support at all, so if this is a big deal to you, consider the next level, which is still only 16 bucks a month. But I'm still taking my chances at the $8 a month level. Until a few more of you
As always, it's a lot easier to get questions answered by a smart person before you sign up.
Rare but catastrophic dumbass mistakes
This was really the only big problem I've had with these guys. At some point after the big DDoS attack, I started losing email sporadically. After a lot of back and forth with the slow tech support, someone finally delved into it. They discovered that someone had managed to delete the mailq on one of the servers that handled my email. This resulted in the email going straight to the bit bucket. Because it was received and instantly deleted, the sender didn't even get a bounce. I had several important requests from clients that just disappeared without a trace.
This sort of thing will probably be a dealbreaker for a lot of people, but I think it's just an issue you're going to have to deal when you get webhosting for $100 a year.
The Good
Despite the downsides, it does have a lot of upsides. Lots of diskspace and bandwidth, but big whoopdeedoo. They have great support for PHP and MySQL. You can even install your custom versions if you have the patience for that sort of thing. Also, shell accounts, Ruby, SSI, CVS (no, not Cyclic Vomiting Syndrome), and more. If you really care about the nitty-gritty, just look at this.
My single favorite geeky thing is being able to execute system commands right from within PHP, so if you want to do something like turn a postscript file into a PDF, it's as freaky simple as:
$convert_pdf =
` convert $_SERVER[DOCUMENT_ROOT]/$file.ps  $_SERVER[DOCUMENT_ROOT]/$file.pdf `;
echo $convert_pdf;
Of course you also have to name your script with a pcgi extension and make sure the permissions are right, but you probably already knew that.
Finally
So go ahead and sign up for Dreamhost. It's a pretty good deal for the money. Probably.
Just don't say I didn't warn you.
November 26, 2005
Tube Coping Calculator - the metric version
Updated:This file now lives here: Tube Coping Calculator
June 05, 2004
Regular Expressions
The interesting part of the little translator that I just posted is a couple of regular expressions. As the O'Reilly description says "Regular expressions are an extremely powerful tool for manipulating text and data." The syntax can a little confusing, but they are amazing useful, and any effort you put into learning them will be richly rewarded.
PHP makes good use of standard Perl-Compatible Regular Expressions, although there are a few differences in how you feed strings to it, and get results back from it.
So, here's a basic explanation of one cryptic bit of the script; the part in red, below.
PHP makes good use of standard Perl-Compatible Regular Expressions, although there are a few differences in how you feed strings to it, and get results back from it.
So, here's a basic explanation of one cryptic bit of the script; the part in red, below.
preg_match ("/pu *(-?\d+)[ ,]+(-?\d+)/i", $my_text2[$key], $match)

"        // string delimiter
/        // search string delimiter
pu *     // search for pu followed by any number of spaces, including none
(        // begin capture (to $match[1])
-?\d+    // any number, including a negative
)        // end capture
[ ,]+    // at least one space and/or comma
(-?\d+)  // same as previous, captured to $match[2]
/i"      // ending delimiters with case-insensitive flag (to allow PU)
So
preg_match searches $my_text2 for the first two identifiable numbers after "pu" or "PU", and puts the result into $match[1] and $match[2].
June 03, 2004
HPGL to G Translator Source
<!DOCTYPE html PUBLIC "-//W3C//DTD XHTML 1.1//EN"
"http://www.w3.org/TR/xhtml11/DTD/xhtml11.dtd">
<html xmlns="http://www.w3.org/1999/xhtml" xml:lang="en">
<head>
<meta http-equiv="content-type" content="text/html; charset=iso-8859-1" />
<title>HPGL to G-Code Translator</title>
<style type="text/css" media="all">
@import "style1.css";
span.g0 { color: #00b; }
span.g1 { color: #070; }
span.m2 { color: #d00; }
div.text{ width: 6in; }
h1 { font-size: 140%; }
</style>
</head>
<body>
<?php
$uri = $_SERVER["SCRIPT_URI"]; // where am I?
$self = $_SERVER["PHP_SELF"]; // who am I?
$dec = $_POST['dec']; // how many decimals?
$scale = $_POST['scale']; // what resolution?
if ($dec < .1 || $dec > 16) {$dec = 5;} // 5 places if none given, 12 max
if ($scale < 1) {$scale = 1016; } // standard resolution for HPGL, maybe
$uploaded = $_FILES['my_text']['name'];
if (!$uploaded){
echo '
<h1>HPGL to G-Code Translator</h1>
<div class="text">
This script will translate simple HPGL-1 (as exported via CorelDraw) into basic RS274NGC (G-Code). Only pen-up (PU) and pen-down (PD) commands with two numbers separated by a space and then a line break are translated.
<br /><br />
For example:<br /><br />
PU0 0;<br />
PD0 22;<br />
PD-1 44;<br />
PD-3 65; and so on.
<br /><br /></div>
<form enctype="multipart/form-data" action="' . $self . '" method="post">
<div>
input resolution: <input type="text" maxlength="5" size="5" name="scale" value="' . $scale . '" />
<br />
number of decimals: <input type="text" maxlength="2" size="3" name="dec" value="' . $dec . '" />
<br /><br />
<input type="hidden" name="MAX_FILE_SIZE" value="40000" />
<input name="my_text" type="file" />
<br />
<input type="submit" value="Translate" />
</div>
</form>';
}
else
{
echo "<div>( Simple RS274NGC translated from HPGL by $uri )
<br />
( Direct any complaints and suggestions to Hal Eckhart at gff5o6j02@sneakemail.com )
<pre>
";
$dec = "%01." . $dec . "f"; // set decimal formatting string
$my_text = @file_get_contents($_FILES['my_text']['tmp_name']) ; // grab the file
$my_text = str_replace ( // add possible missing line breaks
array ("p", "P"),
array ("\np", "\nP"), $my_text );
$my_text2 = explode ("\n", $my_text); // break it into bite-size chunks
// Parse, replace HPGL with G, fix resolution, add syntax coloring
while (!is_null($key = key($my_text2) ) ) {
if (preg_match ("/pu *(-?\d+)[ ,]+(-?\d+)/i", $my_text2[$key], $match)) {
echo "\n<span class=\"g0\">G00 x".sprintf("$dec", $match[1]/$scale)." y".sprintf("$dec", $match[2]/$scale)."</span>\n";
}
elseif (preg_match ("/pd *(-?\d+)[ ,]+(-?\d+)/i", $my_text2[$key], $match)) {
echo "<span class=\"g1\">G01 x".sprintf("$dec", $match[1]/$scale)." y".sprintf("$dec", $match[2]/$scale)."</span>\n";
}
next($my_text2);
}
echo "\n\n<span class=\"m2\">M02</span> </pre></div>";
}
?>
</body>
</html>
April 22, 2004
Technorati fault tolerance hack
Technorati seems like a pretty cool idea, but they've been having some growing pains lately. I found that if you use their default javascript method to insert their link, it can hang up loading your blog if Technorati is unavailable.Here's a PHP way to insert some fault tolerance for any off-site link.
Thoughts?
<?php
$fp = fsockopen("www.technorati.com", 80, $errno, $errstr, 5);
if ($fp) {
echo "<script language=\"javascript\" type=\"text/javascript\"
src=\"http://technorati.com/embed/(your #).js\">
</script>";}
?>
April 17, 2004
Crate Cut-List Calculator
Here's something I've been working on intermittently for about 14 years. It's a little script that takes three dimensions and builds a crate to fit them. You can also change the default lumber size, toggle spacing, and a couple of clearance dimensions.As usual, this probably isn't as interesting for what it does, as for what it illustrates. In addition to calculating and collating a cut list, pictures of the pieces are drawn and dimensioned so you can see what you're asking for. That's also pretty handy when you get to construction.
Some of the terminology comes from building flats for the theater.

April 10, 2004
Pseudo Gear Generator
I was feeling frustrated with trying to draw a gear (of sorts) in a graphics program, so I hacked my ellipse script to oscillate a specified distance on either side of the diameter. Yah, you betcha. It does actually work.If anyone actually wants to see the source, just let me know.
HPGL:
processed 99 lines cutting area - 2.2" by 2.2"

April 03, 2004
March 30, 2004
PHP Pigmentator
The following was tweaked for PHP 5 with this guy's help.
PHP's
highlight_file function is a quick and dirty way to
achieve basic
syntax coloring, which can make your code a
lot easier to read. The dirty part is its egregious use of icky invalid (at
least for XHTML) font tags.
Some of the user contributed notes explain various methods for fixing this. I've cobbled together a few of these and tweaked them to get rid of the non-breaking spaces, which seem to make a mess of copying and pasting the code. Us lazy people hate to type when we don't have to. The downside is that we have to use a <pre> tag, so it won't wrap nicely. If you don't like really wide pages, then you'd better hard wrap your code before you feed it to the colorizer.
If you feed this beast some code, it will spit it back to you in two versions. First, colorized and rendered in the browser, and then as raw XHTML in a text box, ready to be copied and pasted into a page. At the bottom of the page is the CSS style declaration used to colorize the spans produced by this script.
CSS style declaration
div.phpcode span.html { color: #000; }
div.phpcode span.comment { color: #f80; }
div.phpcode span.default { color: #00b; }
div.phpcode span.keyword { color: #070; }
div.phpcode span.string { color: #d00; }
div.phpcode span.comment { color: #f80; }
div.phpcode span.default { color: #00b; }
div.phpcode span.keyword { color: #070; }
div.phpcode span.string { color: #d00; }
PHP Pigmentator source
<?php
$uploaded = $_FILES['my_text']['name'];
if (!$uploaded){
echo '
<div class="phpcode">
PHP\'s <a href="http://www.php.net/manual/en/function.highlight-file.php">
highlight_file </a> function is a quick and dirty way to <span class="comment">
achieve </span> <span class="default"> basic </span> <span class="keyword">
syntax </span><span class="string"> coloring</span>, which can make your code a
lot easier to read. The dirty part is its egregious use of icky invalid (at
least for XHTML) font tags.
<br />
<br />
Some of the user contributed notes explain various methods for fixing this.
I\'ve cobbled together a few of these and tweaked them to get rid of the
non-breaking spaces, which seem to make a mess of copying and pasting the code.
Us lazy people hate to type when we don\'t have to. The downside is that we have
to use a <pre> tag, so it won\'t wrap nicely. If you don\'t like really
wide pages, then you\'d better hard wrap your code before you feed it to the
colorizer.
<br />
<br />
If you feed this beast some code, it will spit it back to you in two versions.
First, colorized and rendered in the browser, and then as raw XHTML in a text
box, ready to be copied and pasted into a page. At the bottom of the page is
the CSS style declaration used to colorize the spans produced by this script.
<br />
<br />
<br />
<form enctype="multipart/form-data" action="';
echo $_SERVER["PHP_SELF"];
echo'" method="post">
<div>
<input type="hidden" name="MAX_FILE_SIZE" value="40000" />
<input name="my_text" type="file" />
<br />
<input type="submit" value="Feed Me!" />
</div>
</form>
</div>';
}
else
{
echo "<h2>highlighted source of: $uploaded </h2> <ins><hr /></ins>";
// Use class names instead of colors
ini_set('highlight.comment', 'comment');
ini_set('highlight.default', 'default');
ini_set('highlight.keyword', 'keyword');
ini_set('highlight.string', 'string');
ini_set('highlight.html', 'html');
// Highlight PHP code
function highlight_php($code, $return = FALSE)
{
// Using OB, as highlight_string() only supports
// returning the result from 4.2.0
ob_start();
highlight_string($code);
$highlighted = ob_get_contents();
ob_end_clean();
// Fix output to use CSS classes and wrap well
// Hacked by Hal to get rid of ugly nbsps
$highlighted = '<div class="phpcode">' . str_replace(
array(
'<code>',
'</code>',
'style="color: ',
'<br />',
' '
),
array(
"<pre><code>",
"</code></pre>",
'class="',
"\n",
' '
),
$highlighted
) . '</div>';
if ($return) { return $highlighted; }
else { echo $highlighted; }
}
ob_start();
@highlight_php(join("", file($_FILES['my_text']['tmp_name'])));
$highlighted2 = ob_get_contents();
ob_end_clean();
echo $highlighted2;
if ($uploaded){
echo '<h2>Encoded XHTML:</h2><textarea name="my_text" rows="25" cols="55" id="my_text">';
echo htmlentities($highlighted2);
echo '</textarea>';
}
}
echo '<br /><h2>CSS style declaration</h2>
<div class="phpcode">
<span class="html">div.phpcode span.html { color: #000; }</span><br />
<span class="comment">div.phpcode span.comment { color: #f80; }</span><br />
<span class="default">div.phpcode span.default { color: #00b; }</span><br />
<span class="keyword">div.phpcode span.keyword { color: #070; }</span><br />
<span class="string">div.phpcode span.string { color: #d00; }</span><br />
<br /></div>';
?>
March 27, 2004
Ellipse generator
Yet another in my series of thingies rather crudely copy/pasted from an
old project of mine.
Here's a thing that draws ellipses (or circles, if you do it right) and even outputs paths for cutting them. Use at your own risk. Especially if you have a loose grip on your marbles.
Here's a thing that draws ellipses (or circles, if you do it right) and even outputs paths for cutting them. Use at your own risk. Especially if you have a loose grip on your marbles.
|
Print HPGL output @ 1000 steps per inch | processed 615 lines cutting area - 3.6" by 2.2" |
Source:
<div class="deftext">
Here's a thing that draws ellipses (or circles, if you do it right) and even outputs paths for cutting them. Use at your own risk. Especially if you have a loose grip on your marbles.
<br />
<ins><hr /></ins>
</div>
<table border="0" cellpadding="0"><tr><td class="top">
<?php
$dupx = $_POST['dupx']; // how many horizontal
$dupy = $_POST['dupy']; // how many vertical
$rectx = $_POST['rectx']; // ellipse width
$recty = $_POST['recty']; // ellipse height
$kerf = $_POST['kerf']; // allowance for cutter
$clear = $_POST['clear']; // space between pieces
$res = $_POST['res']; // resolution
$tried = $dupx || $dupy;
if ($tried) {
$dupx=intval($dupx);
$dupy=intval($dupy);
}
?>
<form action="<?php echo $_SERVER['PHP_SELF'] ?>" method="post">
<table class="inputtable">
<tr><th class="red-s">(decimal inches only)</th></tr>
<tr><td>Ellipse width </td><td><input type="text" maxlength="5" size="5" name="rectx" value="<?php if ($rectx<.1){$rectx = 1;echo $rectx; }else {echo $rectx;} ?>" /></td></tr>
<tr><td>Ellipse height </td><td><input type="text" maxlength="5" size="5" name="recty" value="<?php if ($recty<.1){$recty = 2;echo $recty; }else {echo $recty;} ?>" /></td></tr>
<tr><td>Horizontal repeat<br />
max = 8 </td><td><input type="text" maxlength="2" size="3" name="dupx" value="<?php if ($dupx<1 or $dupx>8){$dupx = 2;echo $dupx; }else {echo $dupx;} ?>" /></td></tr>
<tr><td>Vertical repeat<br />
max = 8 </td><td><input type="text" maxlength="2" size="3" name="dupy" value="<?php if ($dupy<1 or $dupy>8){$dupy = 1;echo $dupy; }else {echo $dupy;} ?>" /></td></tr>
<tr><td>Cutter kerf offset </td><td><input type="text" maxlength="5" size="5" name="kerf" value="<?php if ($kerf<.0001){$kerf = .03;echo $kerf; }else {echo $kerf;} ?>" /></td></tr>
<tr><td>Spacing for multiples </td><td><input type="text" maxlength="5" size="5" name="clear" value="<?php if ($clear<.01){$clear = .375;echo $clear; }else {echo $clear;} ?>" /></td></tr>
<tr><td>Resolution </td><td><input type="text" maxlength="4" size="5" name="res" value="<?php if ($res<1){$res = 1000;echo $res; }else {echo $res;} ?>" /></td></tr>
</table>
<p><input type="hidden" name="tried" value="yes" />
<input type="submit" value="<?php echo $tried ? 'recalculate' : 'calculate'; ?>" />
</p></form>
<?php
$clear = $clear*$res;
$lead = 100;
$kerf2 = $kerf*2;
$kerfz = $kerf*$res*$zoom2;
$rad = ($rectx+$kerf2)/2;
$rad2 = ($recty+$kerf2)/2;
$rectx = ($rectx+$kerf2)*$res;
$recty = ($recty+$kerf2)*$res;
$seg = pi()/round(128); // segment resolution
$start = pi()/4; // pi is top, 0 is bottom, pi/4 is 45 deg. lead-in
$id = uniqid("");
$id1 = "a".$id;
$mystring = "SP1;\n";
$filename = "$_SERVER[DOCUMENT_ROOT]/cache/$id1.txt";
touch($filename);
chmod($filename,0666);
$handle = fopen($filename, 'a');
fwrite($handle, $mystring);
for ($c1 = 1; $c1 <= $dupx; $c1++)
{
$y = 0;
for ($c = 1; $c <= $dupy; $c++)
{
$mystring = "\nPU" . (-round(sin(pi()/4)*$rad*$res)+round($x+($rectx/2)) -100) . " " . (-round(cos(pi()/4)*$rad2*$res)+round($y+($recty/2)) -100) .";\n";
fwrite($handle, $mystring);
for ($i = $start; $i <= 2*pi()+$start+.01; $i=$i+$seg)
{
$mystring = "PD". (-round(sin($i)*$rad*$res)+round($x+($rectx/2)))." ". (-round(cos($i)*$rad2*$res)+round($y+($recty/2))).";\n";
fwrite($handle, $mystring);
}
$y = round($y+$recty+$clear);
}
$x = round($x+$rectx+$clear);
}
$mystring = "\nSP0;\n";
fwrite($handle, $mystring);
fclose($handle);
$my_text = $_POST['my_text'];
if (empty($my_text)){$my_text = @file_get_contents("$_SERVER[DOCUMENT_ROOT]/cache/$id1.txt") ;}
?>
<form>
<p>
<textarea name="my_text" rows="7" cols="25"><?php echo $my_text; ?></textarea>
<br />
<br />
</p>
</form>
<?php
echo "<a href=\"/cache/$id1.txt\">Print HPGL output @ $res steps per inch</a><br />
";
// make pitchers outta hpgl...
$xmin = 0;
$ymin = 0;
if (file_exists("$_SERVER[DOCUMENT_ROOT]/cache/$id1.txt"))
{
$fd = fopen("$_SERVER[DOCUMENT_ROOT]/cache/$id1.txt", "r");
while (!feof ($fd)) {
$buffer = fgets($fd, 4096);
if (preg_match ("/p[ud](-?\d+) (-?\d+)/i", $buffer, $match)) {
$xmax = max($xmax, $match[1]);
$ymax = max($ymax, $match[2]);
$xmin = min($xmin, $match[1]);
$ymin = min($ymin, $match[2]);
$n = $n+1;
}
}
$res2 = max($xmax/500,$ymax/500,3);
$pad = max (40, -$xmin,-$ymin)/$res2;
$xdim = ($xmax-$xmin)/$res2+$pad;
$ydim = ($ymax-$ymin)/$res2+$pad;
$x2 = $pad;
$y2 = $ydim;
$pic=ImageCreate($xdim+$pad,$ydim+$pad);
$white=ImageColorAllocate($pic,255,255,255);
$trans=imagecolortransparent($pic,$white);
$green=ImageColorAllocate($pic,255,0,0); // red for line 1
$red=ImageColorAllocate($pic,255,0,0);
$black=ImageColorAllocate($pic,0,0,0);
ImageFilledRectangle($pic,$pad-2.4,$ydim-2.4,$pad+2.4,$ydim+2.4,$red);
$fd = fopen("$_SERVER[DOCUMENT_ROOT]/cache/$id1.txt", "r");
while (!feof ($fd)) {
$buffer = fgets($fd, 4096);
if (preg_match ("/pu(-?\d+) (-?\d+)/i", $buffer, $match)) {
$x1 = $match[1]/$res2+$pad;
$y1 = $ydim-($match[2]/$res2);
ImageLine($pic,$x1,$y1,$x2,$y2,$green);
$green=ImageColorAllocate($pic,20,225,100);
$x2 = $x1;
$y2 = $y1;
}
elseif (preg_match ("/pd(-?\d+) (-?\d+)/i", $buffer, $match)) {
$x1 = $match[1]/$res2+$pad;
$y1 = $ydim-($match[2]/$res2);
ImageLine($pic,$x1,$y1,$x2,$y2,$black);
$x2 = $x1;
$y2 = $y1;
}
}
ImagePNG($pic,"$_SERVER[DOCUMENT_ROOT]/cache/$id1.png");
ImageDestroy($pic);
}
// end make pitchers
echo "</td><td class=\"top\"> processed $n lines cutting area - ",round(($xmax-$xmin)/$res,1),"\" by ",round(($ymax-$ymin)/$res,1),"\"<br />
<br />
<img src=\"/cache/$id1.png\" alt=\"picture 1\" /><br />
<br />
";
?>
</td></tr></table>